
Dropper Post Anatomy
Dropper posts are relatively simple. While specific posts vary in details, most droppers include a seat post, a collar, saddle rails, an internal spring mechanism, and a cable actuator. Varying saddle heights are achieved when the inner post (we refer to this as the “upper dropper”) slides into the outer tube (“lower dropper”) using a lever (usually attached to the handlebar) and either a cable or hydraulic hose. Droppers replace the seat post and saddle rails that came with your bike.

How to choose a dropper post
Droppers don’t come in one-size-fits-all configurations. Before you select a dropper post, you’ll need to make a few measurements and decisions. To begin, grab a tape measurer and your bike.
1. Find your seat post diameter
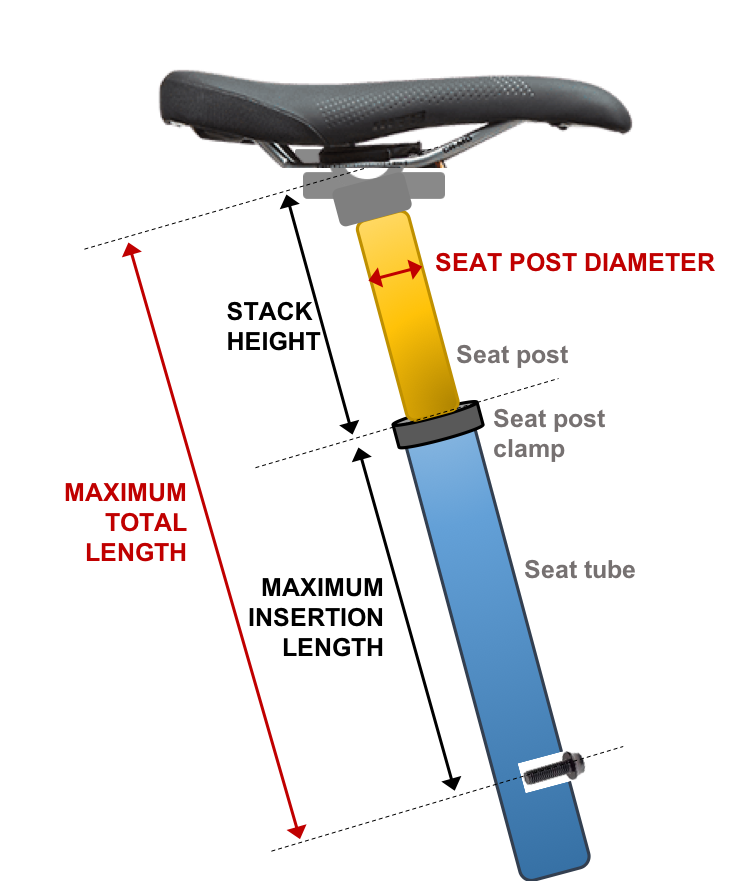
The first measurement you’ll need is the diameter of your seat post. This can be found either online (look up the specs for your bike) or on the seat post that came with your bike—there will be a number stamped or etched onto the post. The most common diameters for newer mountain bikes are 30.9mm and 31.6mm, while some gravel bikes and hardtails are 27.2mm or 24.9 mm in diameter. If your seat tube diameter is not listed above, you will likely need to use a shim (and possibly your local bike-shop expertise).
2. Measure the stack height (usable height)
The next measurement you’ll make is the stack height, which is the distance from your saddle rails to your seat tube. This is the space that can be utilized with a dropper post. Make sure your saddle (regardless of whether there is already a dropper) is in your high, climbing position. Measure the distance between the top of your seat post clamp and the center of your saddle rails.
3. Determine your seat tube’s maximum available bike-tube insertion distance
The insertion length is how far down the dropper post will extend into your seat post. The maximum insertion length is the distance between the top of your seat post clamp and anything that prevents the post from extending further into the seat tube—often a bend or bottom of the seat tube, water bottle cage bolts, or suspension linkages. Some bike mechanics recommend subtracting about 20 mm from this distance to make sure there is room for the cable actuator to function smoothly.
Dropper posts come with a minimum insertion distance (usually clearly marked on the post) and a maximum insertion distance. The minimum insertion length will be indicated on the post and is critical for safety and function. The posts can be inserted at any depth between the minimum and maximum distances; however, keep track of how decreasing the insertion depth increases the distance between your seat post clamp and saddle rails once your dropper is installed!
4. Calculate the maximum total dropper post length
The maximum total length that your extended dropper post can be is found by adding the stack height (Step 2) to the maximum insertion length (Step 3). It’s very important that you choose a dropper post that is less than or equal to the maximum total length.
5. Determine your maximum dropper travel (drop length)
The travel is the distance your seat can be raised/lowered. While it may be tempting to get a dropper with the most travel available, this likely isn’t the best choice – especially if you are a shorter person.
To determine the maximum travel you will be able to use, subtract 30–50 mm from the stack height (Step 3) and choose the next size down. For example, if your stack height is 230 mm, the most dropper travel you can handle will be between 170 and 190 mm. Shorter riders may require droppers with less travel due to the geometry of smaller bikes. Cross-country mountain bikers may prefer a dropper with less travel due to weight considerations.
While some bike frame and dropper post combinations will allow your dropper post collar to be flush with your seat tube clamp, you may want or need some distance between your dropper collar and seat tube clamp. You might need to select a dropper with less travel distance if the lower dropper will extend above your seat post clamp. It is imperative that once your dropper is installed, the total distance between the seat post clamp and saddle rails (including the dropper post’s extended travel, dropper collar, and any casing extending beyond the seat post clamp) is less than or equal to the stack height you calculated in Step 3. Otherwise, you will need to continually estimate and adjust your saddle’s climbing position (rather than simply allowing the dropper to fully extend), which is inefficient and exhausting.

6. Determine whether you need an internally or externally routed dropper
Most modern bikes are designed for internally routed (stealth) dropper posts; however, some bikes—especially older bikes—do not have internal routing capability. Make sure you get the correct routing configuration for your bike! In general, externally routed dropper posts are more of a band-aid than a long-term solution. We recommend you start looking for a newer mountain bike rather than buying an externally routed dropper. Newer frames have an insertion point for your dropper that connects to internal routing between the seat and the headtube.
General Guidelines
Once you familiarize yourself with the parameters involved with choosing a dropper post, keep in mind the following guidelines. At a minimum, the dropper you choose must fit all of these criteria:
The diameter of the dropper should be equal to the diameter of the seat post that came with your bike. It cannot be greater than that diameter. If it is less than that diameter, you will need to use a shim (generally not recommended unless you have no other choice).
The overall length of the fully extended dropper must be less than the total maximum length you calculated in Step 4. Make sure to check whether the actuator is included in the manufacturer’s measurement.
The minimum insertion length of the dropper must be less than or equal to the maximum insertion length capability of your bike tube (see Step 3). It is unsafe to ride with a dropper that has not been inserted to at least the minimum insertion line.
The total length of the dropper that will extend above your seat post clamp (including exposed lower dropper, dropper collar, and travel) must be less than the stack height you calculated in Step 2.
If your bike didn’t come with internal dropper-post routing capability, you must choose a dropper with external routing.
Our Favorite Dropper Posts
Below, we have listed some of our favorite dropper posts to get you headed in the right direction:
Once your dropper post arrives, you can either channel your inner bike mechanic with the help of online DIY videos, or you can take it to your favorite bike shop for installation. Dropper posts are relatively inexpensive upgrades that will give you a huge return on investment in terms of fun and safety!
The Mountain Bike Mastery Course is where we take your mountain bike skills to the next level and way beyond. Join from anywhere in the world for the most in-depth, personalized coaching possible. Make some magic on your bike with Coach Erica Tingey supporting you every pedal stroke of the way.